Excavations and Restoration work at Tel Lachish
Prof. David Ussishkin
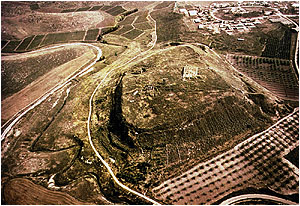
Fig. 1. Tel Lachish, from northwest |
 |
The Site and the Excavations
Tel Lachish (Tell ed-Duweir), the site of biblical Lachish, is one of the largest and most prominent mounds in southern Israel (Fig. 1). The
mound is nearly rectangular, its flat summit covering about 65 dunams. The slopes are very steep as the result of the massive fortifications
constructed here in ancient times.
Extensive, large-scale excavations were carried out at Lachish by three expeditions. The first excavations were conducted by a British expedition,
directed by James Starkey, between 1932 and 1938. These excavations came to a tragic end when Starkey was murdered. The British
excavated on the
|
mound and in the ancient cemeteries surrounding it. The slope at its northwest corner was completely excavated before
becoming the excavation's main dumping ground. The most significant finds on the mound were the late Judean and Persian city gates (Levels II-I),
the outer revetment wall, the Persian 'Residencey' and 'Solar Shrine', and the Late Bronze 'Fosse Temple'.
Small-scale excavations were conducted by Yohanan Aharoni in the area of the 'Solar Shrine' in 1966 and 1968, first on behalf of the Hebrew
University and then Tel Aviv University. The excavations were undertaken to clarify various questions with regard to the 'Solar Shrine' and its
similarity to the Arad shrine discovered by Aharoni.
|
Systematic, large-scale excavations and restoration work were carried out at Lachish between 1973 and 1994 under the direction of Prof.
David Ussishkin, assisted by Dr. Gaby Barkay, Dr. Christa Clamer, Dr. Yehuda Dagan, Mr. John Woodhead and Ms. Orna Zimhoni. The excavations
concentrated in the areas already opened by Starkey as well as in new excavation areas. The main excavation field was Area S - a long, narrow
section at the western edge of the mound aimed at examining the settlement strata down to bedrock (Fig. 2). The lowest strata reached here
date to the Late Bronze Age. Other excavation fields include Area P, with the Judean palace-fort and underlying Middle Bronze palace and Late
Bronze 'Acropolis temple'; Area D, bordering the south-east side of the palace-fort; Area G, containing the city-gates; and Area R, a section in
the southwest corner of the mound, where the Assyrian army breached the city-walls in 701 BCE.
In 1985 the Friends of the Institute of Archaeology of Tel Aviv University initiated the restoration of the Judean city-gate complex. They rightly
believed that following the excavation proper the uncovered remains should be preserved and restored so that the lay visitor should be able to
understand them. The restoration work continued for a number of years, mainly financed by the generous contribution of Jacob Alkow,
|
|
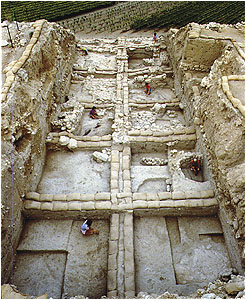
Fig. 2. Area S - the main section at the west of the mound |
but was stopped due to lack of funds. It is hoped to renew the work in the future.
In 1979 Yehuda Dagan initiated a regional survey of the Shephelah. The scheme was a most welcome, complementary addition to the excavations
on the mound. At first, the survey was conducted under the auspices of the Lachish expedition, then later as part of the Archaeological Survey of
Israel. The results of the survey are indispensable for understanding the history of ancient Lachish. The Map of Lachish was the first 'map' to be
surveyed and published.
The Canaanite City
Settlement in Lachish started in the Neolithic period, and by the later part of the Early Bronze Age it was already a large settlement. During the
Intermediate Bronze Age the settlement apparently shifted to a nearby hillock. This settlement and its cemetery were excavated by the British
expedition.
|
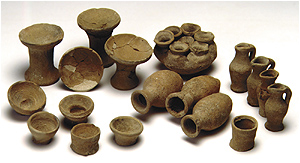
Fig. 3. Votive cultic vessels from the Middle Bronze I cult place |
|
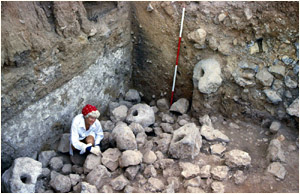
The mound was resettled at the beginning of the Middle Bronze Age. Remains of a cult place dated to Middle Bronze I (=Middle Bronze IIA) and
an assemblage of votive cultic vessels were uncovered in Area D (Fig. 3). During Middle Bronze II Lachish became a major city in southern Canaan.
An impressive glacis was constructed around the site, which shaped its present steep slopes and sharp corners. A rock-hewn fosse was examined
by the British on the west side of the mound. Part of the massive ruler's palace was excavated in Area P in the center of the site. Noteworthy
are the richly furnished tombs excavated the British in cemeteries around the mound. The Middle Bronze city was
|
destroyed by fire at the end of the period.
|
During the Late Bronze Age settlement was renewed. The city developed slowly and eventually became one of the largest and most prosperous
Canaanite cities in Canaan. A number of letters from the rulers of Lachish were found in the el-Amarna archive. By the time of the 20th Egyptian
Dynasty Lachish prospered under Egyptian hegemony. Lachish was completely destroyed by fire, possibly by the invading Sea Peoples, about
1130 BCE, and the site remained abandoned for a long period of time.
The British excavated the 'Fosse Temple' and its rich finds located in the disused fosse on the western side of the site. The 'Acropolis Temple',
dated to the end of the period (Level VI) was excavated in Area P (Fig. 4). The temple included an entrance hall, a central hall with a staircase
leading to the cella (Figs. 5-6), and a cella which was
|
|
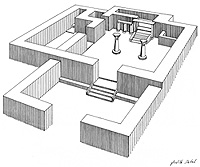
Fig. 4. The 'Acropolis Temple', from west |
very badly preserved. Noteworthy among the finds is a gold plaque depicting a nude Canaanite deity standing on a horse (Fig. 7).
|
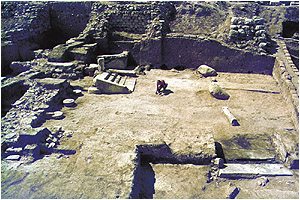
Fig. 5. The 'Acropolis Temple: the main hall, from north |
|
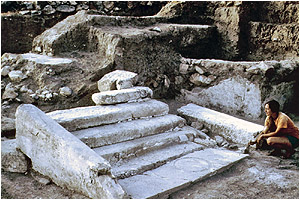
Fig. 6. The 'Acropolis Temple': the staircase leading to the cella |
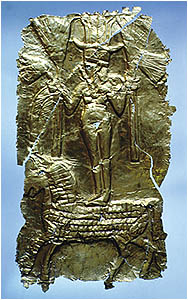
Fig. 7. A gold plaque portraying a naked Canaanite deity standing on a horse |
|
Culture, art and trade prospered in Canaan during the later part of the Late Bronze Age, and Lachish was no exception. Rich finds, such as
Canaanite inscriptions (Fig. 8), carved ivory objects, imported pottery (Fig. 9) and Egyptian metal objects (Fig. 10) are typical. Noteworthy
are many fish bones - remains of fish imported from the coastal area.
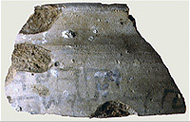
Fig. 8. Proto-Canaanite inscription |
|
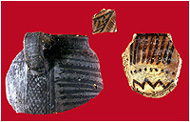
Fig. 9. Qurayyah Painted Ware, imported from Arabia |
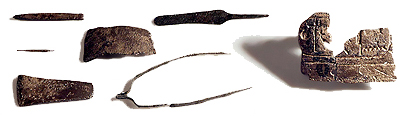
Fig. 10. A cache of metal objects, one containing a cartouche of Ramesses III |
|
The Judean Fortress City
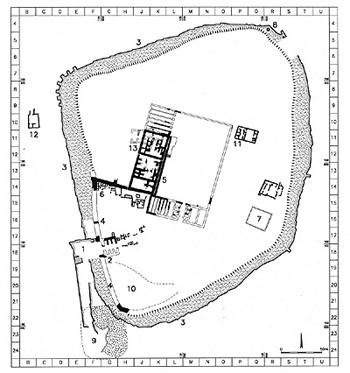
Fig. 11. Tel Lachish, from south |
|
At the end of the tenth century BCE, or more probably during the ninth century, one of the kings of Judah constructed here a fortress city, turning
Lachish into the most important city in Judah after Jerusalem. The fortress city, built according to an overall town planning, included massive
system of fortifications and a huge, central palace-fort complex (Fig. 11). With the lack of inscriptions it is not known who is the king who built
the city and at what date. The fortress city, that is Levels IV and III, continued to serve as the main fortress of the kingdom of Judah till its
destruction by Sennacherib in 701 BCE (Fig. 12).
The fortress city was surrounded by two city-walls - an outer revetment wall surrounding the site at mid-slope, and the main city-wall, extending
along the upper periphery of the site. The outer revetment wall was uncovered in it entirety by the British expedition. Only its lower part, built of
stones, was preserved. It probably served mainly to support a ramp or glacis, which in turn reached the bottom of the main city-wall. The main
city-wall was built of mudbrick on stone foundations. Being
|
more than 6 m thick, its top provided sufficient place for the defenders to stand and fight.
|
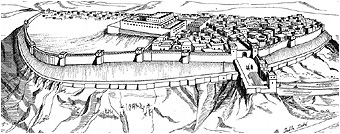
Fig. 12. Reconstruction of Judean Lachish, from west |
|

Fig. 13. The Levels IV-III city-gate |
A complex city-gate, connected to both city-walls, enabled access to the fortress city from the southwest corner. It is the largest, strongest and
most massive city-gate known today in the country. The city-gate complex included two gates: the outer gate, connected to the outer revetment
wall, and an inner gate, connected to the main city-wall, and an open, spacious courtyard between the two gates (Fig. 13). This is the city-gate
which is shown in the Assyrian relief (Fig. 14). The left, northern wing of the inner gate, and the domestic buildings behind it, have been uncovered
in the renewed excavations (Area G) (Fig. 15). As mentioned above, the reconstruction project of the gate has been started, but the project
was stopped due to lack of funds (Fig. 16).
|
|
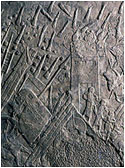
Fig. 14. The relief: the attack on the city-gate |
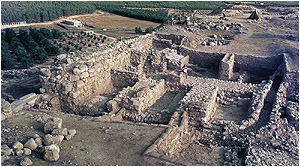
Fig. 15. The Judean city-gate: the excavation of the inner gate, from south |
|
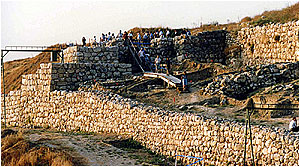
Fig. 16. The partly reconstructed city-gate |
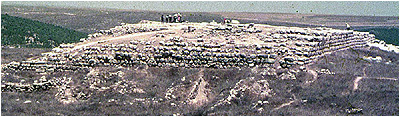
Fig. 17. The Judean palace-fort, from south |
|
The centre of the summit was crowned by the huge palace-fort complex, serving as the center of the garrison and the residence of the Judean
governor (Fig. 17). The palace-fort is undoubtedly the largest and most massive edifice known in Judah. Very little is known today about the building
proper as only the massive
|
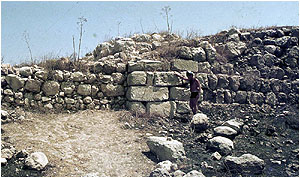
Fig. 18. The Judean palace-fort: the southwest corner |
|
foundations have been preserved (Figs. 18-19). The foundations structure resembles a big box rising above the surrounding surface. The spaces between the
|
|
|
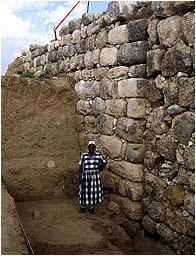
Fig. 19. The Judean palace-fort: the massive foundations |
|
|
|
thick foundation walls were filled with earth. The floor of the building extended at the top
of the foundations, and nothing of the superstructure
|
|
remains today. It can be assumed that a magnificent, monumental edifice rose at the time above these foundations.
|
Finally, a well, which formed the main water source, was located near the city-wall in the northeast corner (Fig. 20). It apparently provided sufficient
quantities of water during times of peace and siege alike. The upper part of the well was lined by stone blocks and the lower part was hewn in the
rock. It was 44 m deep and still contained water when the British expedition uncovered it.
Sennacherib's Conquest of Lachish
The conquest of Lachish by Sennacherib, king of Assyria, during his campaign to Judah in 701 BCE, is unique in the history and archaeology of the
biblical period. This dramatic event is illuminated by the Old Testament, the Assyrian records, the archaeological excavations and the Assyrian reliefs.
In 705 BCE Sennacherib ascended to the throne of Assyria and was soon faced with a revolt organized by Hezekiah king of Judah. In 701 BCE
Sennacherib marched to the region and finally invaded Judah, where his attention was focused primarily on the city of Lachish. Lachish was the
most formidable citadel in Judah, and its conquest and destruction were the paramount task facing Sennacherib when he came to crush the military
powers of Hezekiah. In fact, as indicated by the reliefs, the conquest of Lachish was of singular importance and a great military achievement, since
no other victory was ever recorded by Sennacherib in such a lavish display.
The city of Level III was completely destroyed by fire in 701 BCE when Lachish was conquered by the Assyrian army. The remains of the destruction
have been encountered wherever the excavation reached Level III. The fire was so intense that sun-dried mud-bricks were nearly baked and colored.
An impressive assemblage of pottery was retrieved in the houses of Level III (Fig. 21). The vessels were mostly restored from the fragments dispersed
on the floors of the houses. One group of pottery vessels - known as the royal Judean or lmlk storage-jars - is of special importance (Fig. 22).
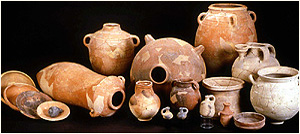
Fig. 21. Pottery of Level III - end of 8th century BCE |
|
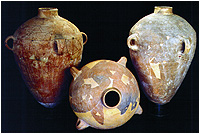
Fig. 22. Storage jars bearing lmlk seal impressions |
|
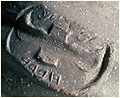
Fig. 23. A lmlk seal impression with a two-winged emblem
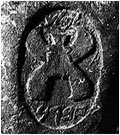
Fig. 24. A lmlk seal impression with a four-winged emblem |
|
These are large jars, uniform in shape and size, which were manufactured in one production center by the Judean government, as part of the military
preparations made before the Assyrian invasion. These jars were used to store oil or wine. They are known from various sites in Judah, but mainly
from Lachish. Their handles were stamped. The stamps included a royal two-winged or four-winged emblem, and an inscription in ancient Hebrew
characters. It reads 'lmlk' that is 'belonging to the king' and the name of one of four towns: Hebron, Sochoh, Ziph or Azekah (Figs. 23-24).
These towns must have been associated with the manufacture or distribution of the storage-jars, or with the produce stored in them. In addition,
some of the jars were also stamped with a 'private' stamp with the name of the potter or an official (Fig. 25).
The southwest corner. When Sennacherib arrived at the head of his army in Lachish, he did not have to deliberate at length on where to direct
the main attack on the city. The obvious answer was dictated by the topography of the site
|
|
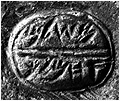
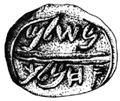
Fig. 25a-b. 'Private' seal impression bearing the name Meshulam (son of) Ahimelech |
|
and the surrounding terrain. The city was enveloped by
deep valleys on nearly all sides, and only at the southwest corner did a topographical saddle connect the mound with
the neighboring hillock. The fortifications at this corner were specially strengthened, but nevertheless,
the southwest corner (and the nearby city-gate)
|
was the most vulnerable and most logical points to assault.
The excavations in the southwest corner were started in 1932, when Starkey cleared large amounts of stones heaped against the slope. Excavations
here were resumed in 1983 (Area R) and it soon became clear that the stones encountered by Starkey were in fact the remains of the Assyrian siege
ramp (Fig. 26).
The siege-ramp of Lachish is the earliest, and the only Assyrian one, which is known today (Fig. 26). At its bottom, it was ca. 70 m wide and ca. 50
m long. The core of the siege-ramp was made entirely of heaped boulders collected in the fields around. It is estimated that the weight of the stones
invested in the construction of the ramp was 13000 to 19000 tons.
|
|
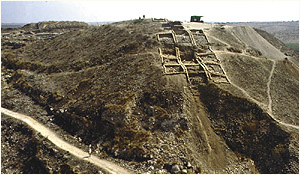
Fig. 26. The southwest corner of the mound: the Assyrian siege-ramp and Area R |
The stones of the upper layer of the ramp were found stuck together by hard mortar, forming a kind of stone-and-mortar conglomerate, which was
preserved at a few points. This layer was the mantle of the ramp, added on top of the loose boulders in order to create a compact surface, enabling
the attacking soldiers and their siege machines to move on solid ground. The top of the siege-ramp was crowned by a platform made of red soil; being
sufficiently wide, it provided even ground for the siege-machines to stand upon.
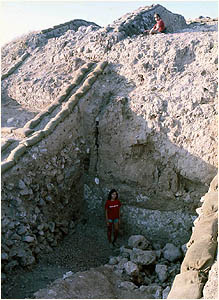
Fig. 27. The façade of the city-wall at the point of the Assyrian attack |
|
Above the siege-ramp were uncovered the fortifications which were especially massive and strong at this point. The outer revetment wall formed here
a tower topped by a kind of balcony on which the defenders could stand and fight. The façade of the tower, built of mudbrick on stone
foundations, was ca. 6 m high - preserved nearly to its original height (Fig. 27).
Once the defenders of the city saw that the Assyrians are building a siege-ramp, they started to lay down a counter-ramp inside the main city-wall.
Dumping here large amounts of mound debris taken from earlier levels of the mound, they constructed a large ramp, higher than the main city-wall,
which provided them with a new defense line once the city walls fell to the enemy.
As a result of the construction of the counter-ramp, the south-west corner became the highest part of the mound. It was a very impressive rampart,
its apex rising ca. 3 m above the top of the main city-wall. Some wooden make-shift fence or wall must have been erected here, but its remains were
not preserved. Soundings in the core of the counter-ramp revealed accumulations of mound debris containing pottery of earlier levels, as well as
limestone chips, which were dumped in diagonal layers.
|
The siege-machines were used by the Assyrians to destroy the defense line on the walls, and no less than five siege-machines arrayed for battle on
top of the siege-ramp are portrayed in the Lachish relief. The South-African artist Gert le Grange who took part in the excavations, prepared an
excellent reconstruction of such a siege-machine in battle (Fig. 28). The machine moves on four wheels, partly protected by its body, which is made
in six or more sections for easy dismantling and reassembling. The ram, made of a wooden log reinforced with a sharp metal point, is suspended from
one or more ropes, like a pendulum, and several crouching soldiers are moving it backwards and forwards. The defenders standing on the wall are
throwing flaming torches on the siege-machine. As a counter measure, an Assyrian soldier is pouring water from a long ladle on the façade of
the machine to prevent it from catching fire. The artist did not forget to add a cauldron containing water beside this soldier.
|
|
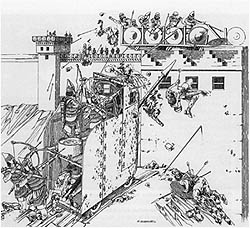
Fig. 28. The Assyrian attack: a reconstruction by Gert le Grange |
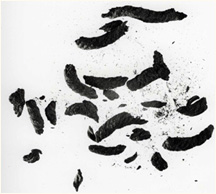
Twelve 'perforated stones' were discovered at the foot of the city-walls (Fig. 29a). These are large perforated stone blocks, with a flat top, straight
sides, and an irregular bottom. Each of them is nearly 60 cm in diameter and weighs about 100 to 200 kgs. Remains of burnt, relatively thin ropes were
found in the holes of two of these stones (Fig. 29b).
 |
|
 |
|
| Fig. 29a-b. 'Perforated stones' and carbonized ropes found in their holes |
It seems that the 'perforated stones' formed part of the weaponry of the defenders. The stones were probably tied to ropes and lowered from the wall
in an attempt to damage the siege-machines and prevent the rams from hitting the wall; they must have dropped the stones on the siege-machines
and moved them to and fro like a pendulum.
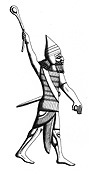 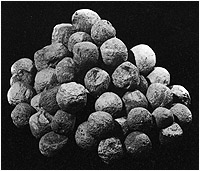
Fig. 30a-b. An Assyrian slinger depicted in the relief and slingstones from Lachish |
|
The Lachish relief displays slingers shooting at the walls as well as defenders shooting at the attackers, and many slingstones were indeed found in
the excavations (Fig. 30a-b). These are round balls of flint or limestone, shaped like tennis balls, each weighing 250 gr or more.
The Lachish relief displays Assyrian archers supporting the attack, and close to a thousand arrowheads were discovered in the excavation of the
southwest corner (Fig. 31a-b). The arrowheads are not uniform in size or shape; they were mostly made of iron, and a few were made of bronze or
carved of bone. Most of the arrowheads were uncovered in the burnt mudbrick
|
debris in front of the city-walls. Apparently these arrows were shot by
Assyrian archers at warriors standing on top of the wall. The discovery of so many arrowheads in such a small area shows how concentrated the
Assyrian fire-power was. Many arrowheads were found bent - an indication that they were shot at the walls with powerful bows from close range.
The Lachish reliefs. Sennacherib constructed his magnificent royal palace, now known as the Southwest palace, in his capital Nineveh. The
palace was largely excavated in 1850 by Sir Henry Layard on behalf of the British Museum in London. Centrally situated in the palace was Room XXXVI
which contained the Lachish reliefs.
The walls of Room XXXVI were covered by the series of the Lachish reliefs, which was about 27 m long. This is the longest and most detailed series
of Assyrian reliefs depicting the conquest of a single fortress city. Layard transferred most of the reliefs to the British Museum where they are
presently exhibited to the public.
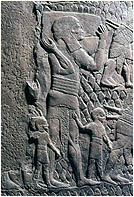
In consecutive order from left to right are portrayed the reserve consisting of horsemen and charioteers, the attacking infantry, the storming of the
city, the transfer of booty, captives and families going into exile, Sennacherib sitting on his throne, the royal tent and chariot, and finally the
Assyrian military camp.
The central scene depicts the attack on the city walls. The city-gate is shown in the center, being attacked by a siege-machine, and defended by
Judean warriors (Fig. 14). Refugees carrying their belongings leave the city through the gate.
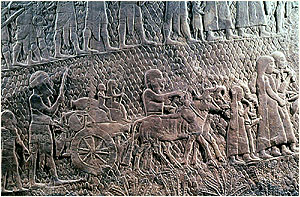
The inhabitants are portrayed leaving the destroyed city to exile, taking their belongings with them, a tragic picture of entire families forced out of
their home. The families include men, women and children, and they carry their belongings in carts harnessed to oxen (Figs. 32-33).
|
|
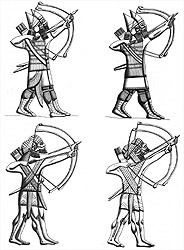 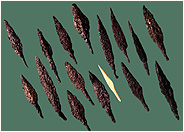
Fig. 31a-b. Assyrian archers depicted in the relief and arrowheads from Lachish |
Figs. 32-33. The relief: A Judean family leaving the destroyed city |
|
The deportees are distinguishable by their appearance and dress. The women wear a long, simple garment. A long shawl covers their head, shoulders
and back, reaching to the bottom of the dress. The men have a short beard and their heads are wound with scarves whose fringed ends hang down.
Their garment has a fringed tassel hanging between
|
the legs. Both men and women are barefooted.
Facing the city and the deportees Sennacherib is shown sitting on his magnificently decorated throne, brought hither from Assyria (Fig. 34). The
cuneiform inscription, carved in the background identifies the assaulted city as Lachish. Finally, behind the Assyrian monarch, are shown the royal
tent and chariots and then the Assyrian camp.
The Late Judean and Persian Period cities
After a period in which Lachish was apparently abandoned, the settlement was apparently renewed and refortified (Level II). The Level II city was
poorer, less densely inhabited, and had weaker fortifications than its predecessor. It was destroyed by fire during the conquest of Judah by the
Babylonians in 587/586 BCE. Lachish is mentioned in Jeremiah 34 7 as one of the fortified cities in Judah that Nebuchadnezzar attacked.
A group of Hebrew ostraca, known as the 'Lachish letters' was found by the British expedition sealed beneath the destruction debris in the ruined
city-gate. They date to shortly before the Babylonian conquest and were sent to a military commander
|
|
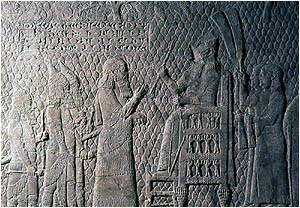
Fig. 34. The relief: Sennacherib sits on his throne at Lachish |
named Yaush. These ostraca form one of
the most important groups of pre-exilic Hebrew inscriptions known today.
Level I dates to the Babylonian, Persian and Early Hellenistic periods. During the Persian period Lachish served as a district center. The settlement
was refortified and a palace (The 'Residency') and a temple (The 'Solar Shrine') were built here. The settlement at Lachish was abandoned at the
end of the Hellenistic period, in the second century BCE, and Marisa (Mareshah) and then Eleutheropolis (Beth Guvrin) became the major cities in
the region.
|
Publications
D. Ussishkin, Royal Judean Storage Jars and Private Seal Impressions, Bulletin of the American Schools of Oriental Research 223, 1976, pp. 1-13.
D. Ussishkin, The Destruction of Lachish by Sennacherib and the Dating of the Royal Judean Storage Jars, Tel Aviv 4, 1977, pp. 28-60.
D. Ussishkin, Excavations at Tel Lachish - 1973-1977, Preliminary Report, Tel Aviv 5, 1978, pp. 1-97.
D. Ussishkin, The 'Lachish Reliefs' and the City of Lachish, Israel Exploration Journal 30, 1980, pp. 174-195.
D. Ussishkin, The Conquest of Lachish by Sennacherib, (Publications of the Institute of Archaeology, Tel Aviv University, No. 6), Tel Aviv, 1983.
D. Ussishkin, Excavations at Tel Lachish 1978-1983: Second Preliminary Report, Tel Aviv 10, 1983, pp. 97-175.
D. Ussishkin, Levels VII and VI at Tel Lachish and the End of the Late Bronze Age in Canaan, in: J.N. Tubb (ed.), Palestine in the Bronze and Iron Ages, Papers in Honour of Olga Tufnell, London, 1985, pp. 213-230.
D. Ussishkin, The Assyrian Attack on Lachish: The Evidence from the Southwest Corner of the Site, Tel Aviv 17, 1990, pp. 53-86.
D. Ussishkin, Excavations and Restoration Work at Tel Lachish: 1985-1994, Third Preliminary Report, Tel Aviv 23, 1996, pp. 3-60.
D. Ussishkin, The Renewed Archaeological Excavations at Lachish (1973-1994), Volumes I-V, (Monographs of the Institute of Archaeology, Tel Aviv University, No. 22), Tel Aviv, 2004.
D. Ussishkin, Symbols of Conquest in Sennacherib's Reliefs of Lachish - Impaled Prisoners and Booty, in: T.F. Potts et al. (eds.), Culture Through Objects: Ancient Near Eastern Studies in Honour of P.R.S. Moorey, Oxford, 2003, pp. 207-217.
Y. Dagan, Archaeological Survey of Israel: Map of Lakhish (98), Jerusalem, 1992.
|

